Monday, September 28, 2020

September OMG Finish

At the beginning of September, I set a goal to quilt my Mini Candy Box quilt.  You can read about it here.  

This is the finished quilt.


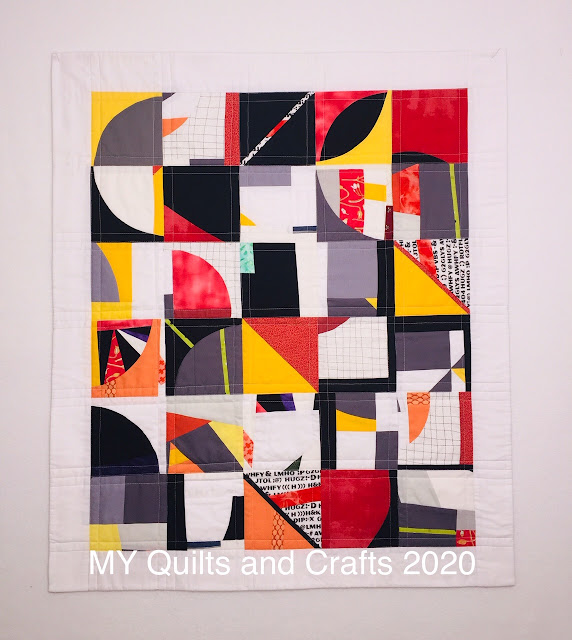
Mini Candy Box - front


Mini Candy Box - back


I contemplated how to quilt this quilt for almost a month.  I pinned it on the design wall and looked at it every time I walked by.  It's not a big quilt, 27" x 30.5", so I thought I would do a lot of quilting on it, either straight line quilting or try out free motion quilting.  I even thought of quilting from the back because I just love the backing fabric.  I tried it on a sample piece, but I didn't like the look of the needle marks on the front when I sew from the back.  Back to square one! 

The more I looked at it, a little bird told me otherwise.  The quilt top is very busy, so I decided to do simple quilting on it.  I didn't want too much quilting to distract the eyes from the design.   Then I finished it with facing instead of binding.  I really like the clean look on the front.

Now go check out the September Finish link-up to see many beautiful works here.

Update:

On Sept. 2nd, I wrote about basting, and tried thread basting for the first time.  When I thread basted this quilt, a few thoughts came to mind.

1. I got jabbed quite a bit while using a basting needle.  It's not fun  and I had to be extra careful not to bleed onto the quilt top.  Hopefully this will get better with time.

2. It's a very time consuming process, more than pinning, I think.

3. I didn't like it when the thread ran out and have to re-thread the needle.  That's just me, my bad.

When it's time to quilt, I liked it that the top didn't move a whole lot.  I did sew over the basting thread in a few places, but didn't have much problem when it's time to pull out the thread.  I cut up the basting thread and used an awl to help pull the thread that got run over.  Not a significant problem.  Maybe because I didn't heavily quilt this piece.  

Over all it's quite an interesting experience.  I'll have to do it again with a bigger quilt and see if I would feel the same.


I also pulled out some fabric for a new project.  Here is a sneak peek.  


Have a great week everyone. 


Tuesday, September 22, 2020

A New Finished Quilt

A quick post to show you the finished quilt for my friend’s daughter who’s going through chemotherapy to fight a very aggressive breast cancer. 


It’s done and delivered yesterday.  I heard that patients often get cold during the treatment, I hope this quilt will keep her warm.

Now I have to get back to my other projects.


Keep calm and quilt on..... 


Friday, September 11, 2020

A New Quilt

 Hi Everyone,

I have a rush project this week.  My neighbor's daughter is under go a chemo treatment for a very aggressive breast cancer.  I want to make a quilt that she can take with her when she receives that treatment.  It's not going to be a big quilt, just about 4'x5'.  She likes soft purple, her mom said.  I don't have many purple so I went to my local quilt shops.  These are the fabric I picked out.


This is what on my design wall right now.  Today I'll be finishing up the top.


 Keep calm and quilt on........


Wednesday, September 2, 2020

In Search of a Basting Method

 Hi Everyone,

Today I want to talk about basting a quilt.  I've tried pin and spray basting.  They both have positive and negative aspects to them.  Pinning is a tried and true way to baste a quilt.  The only negative thing is that I have to do it on the floor which is fine with me, except that I don't have floor space in my place.

In recent years, spray basting has gained more popularity among quilters.  My experience with it is very limited because I have only tried it on some of my wall hanging quilts which I think it's a good size for it.  When I tried it on a bigger quilt, like my sister's quilt, you can see the picture here.  The quilt is 70"x80" before quilting, and it didn't work out well for me.  After I spray basted the quilt using pool noodles on a table, I have to heat set the glue with a dry iron which was a challenge for me.  After I repurposed a 30"x72" working table for an ironing table, I still had a hard time repositioning the fabric which shifted during the process of  heat setting.  I gave up, undid everything and went back to pins.  Now it's ready for quilting.

Another problem I had with spray basting is that the glue came out as a blob.  The picture below is my quilt 'Subtraction'.


To this day I can't get the glue stains off the back of the quilt.  If anyone know how to get rid of the glue stains, please share.  Thank goodness that the stains didn't show up on the top.  Only I know they are there but I would love to know how to get them off the quilt.  😢

The third method of basting, that I know of, is thread baste.  I've read about this sometime ago.  It was the way our ancestors in quilting did it in the old days.  Some still do it now.  I visited a blog by Sophie at  Luna Lovequilts and read her tutorials on thread basting method.  You should go to her site and see her quilts.  I decided to give it a try for my small quilt called 'Mini Candy Box'.  Here it is, all basted and ready to be quilted.


I didn't have basting thread so I used an old cheap thread that I have before my quilting obsession days.  I think any thread that can be easily broken will do.   Quilting this quilt will be my Sept. OMG goal.  I'll let you all know how it goes.


That's All Folks!!!  See you next time.


Stay well and quilt on.......