Tuesday, December 2, 2014

Getting ready for my Boutique

In the past 7 years, except last year, I've held Holiday Boutique Sale a few times a year.  Making crafts is my hobby and I want to see if they are marketable.  If you've been reading my blogs, you'll see what I love to make.  Some items are more popular than the other.  My jewelry and handmade bag items are doing really well.  For this year, I added some pincushions to the list.  Here are some of this year selections.  I think they are adorable and are great gifts for my sewing friends.

This year jewelry items are a little different than the year past.  Here are some previews.
5-strand mixed semiprecious stones, beads and sterling silver

Hand knotted rhodium and wood pendant necklace

Mixed Rhodium beads adjustable leather bracelet
I also have some baby blankets and handmade bags on sale.  


Click here for Pincushion tutorial


Click here for Raspberry Jam recipe


Monday, November 24, 2014

Taking a break from quilting book projects to make jam

Today I took some time off from quilting book projects to make some jam.  My favorite is pomegranate-strawberry jam, but I wanted to make pomegranate-raspberry today.

I'm having lots of fun juicing the pomegranate fruits that I got from markets, and they are at the great price right now.  I didn't use any juicer.   Instead, I open them up into segments, turn each segment up side down over a big bowl of water in the sink and knock the skin with a wooden spoon.  The small gems will fall down into the water.  After rinsing them, I put them in a clean, dry bowl.  Then I scoop about 3 cups at a time into a food processor with a dough blade, process them for a few minutes and empty the liquid mess into a strainer set over another clean bowl, I use a 10-cup measuring cup.  I let it drain for a few minute then use the back of a wooden spoon to press down all the juice before discarding the seeds.  I put the peels, seeds and everything else into the compost pile later.  For 4 large pomegranate, about 5-6 lbs., I got about 4 cups of juice.  In the picture below, the seeds are from 12 lbs. of pomegranate fruits.


Ingredients:

4 cups raspberry
3 cups pomegranate juice
4 cups sugar
2 tbsp. lemon juice (optional)

Instructions:

1. Put raspberry in a large non-reactive pot and mashed it a little bit with potatoes masher.
2. Pour in the pomegranate juice and lemon juice if using.
3. Put in the sugar, bring to a boil, stir occasionally.
4. Cook it about 10 minutes or until the temperature reach 220 F.  The jam will become thick.


5. Test to see if the jam is set, I like the cold plate method.  Drop syrup on a small plate about 1 inch diameter big and put the plate in the freezer for 1-2 minutes.  Run your finger through the syrup, creating a line right in the middle of the syrup.  If the syrup on both side of the line doesn't run to each other, the jam is set.

6. Turn off the fire, let it sit for about 5 minutes.
7. Ladle the jam into sterilized jars.
8. Turn the jars upside down for 10 minutes, then turn them right side up.  Soon you'll hear a pop sound from each jar, signaling that the lids are sealed. 


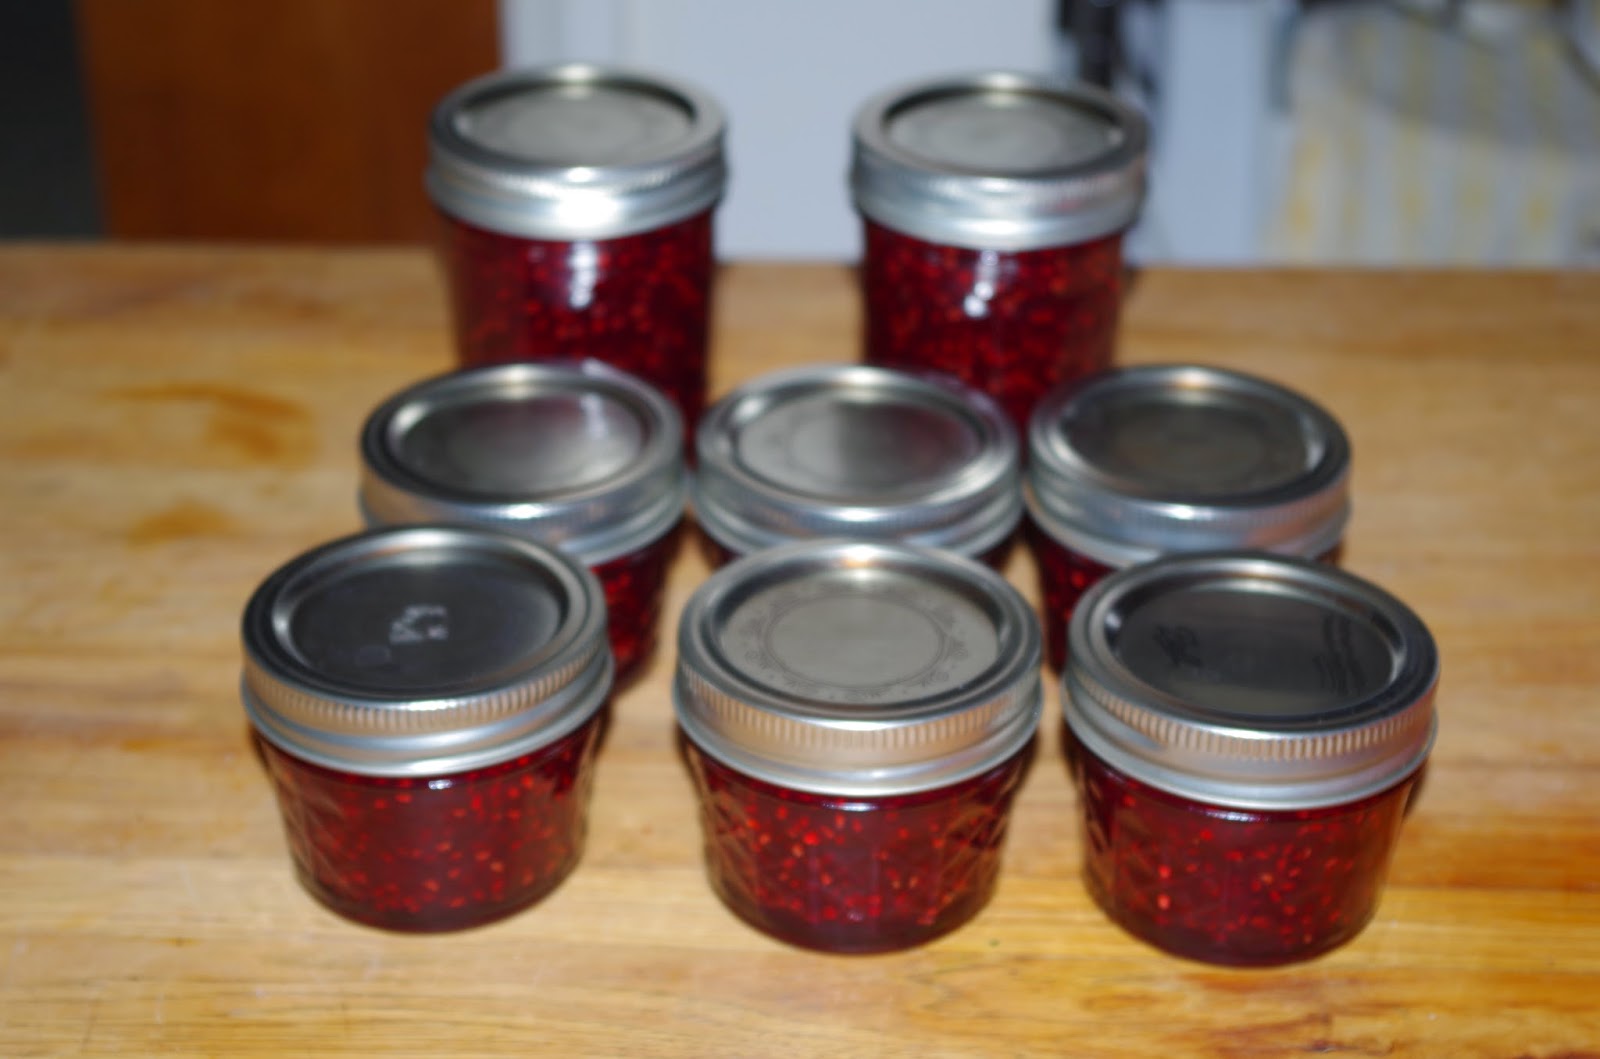
This recipe makes 2 8-oz. jars and 6 4-oz. jars.   Enjoy!!
I love mine on a homemade bread toast with butter.   :)


Saturday, November 8, 2014

My hand quilting experience continue.....Part 3

We finally are done with the hand quilting job.  It has been great 2 months; quilting with my dear friend in the morning.  Here are some snap shots of the quilt.   Now I have to put binding on it.  It's going to be a challenge to square up this quilt.


My dear friend, JoAnn


Thursday, October 23, 2014

Pincushion tutorial

I love making pincushions.  Sometimes when I'm tired from looking at quilts that I've been working on for awhile, I'll take a break and make a pincushion using the scraps at hand.  I went wild and made quite a few so I would like to share them with you.

I like to use unusual containers for my pincushions.  I've been collecting milk glass for quite some time and have built quite a collection.  I would buy them wherever I see them; in a thrift store while we were on the road, garage sale round town and gifts from family and friends.

You'll need some fabric, crushed walnut shell (I got mine from a pet supply store), strong thread and sewing needle, hot glue, and a container of your choice with an opening between 3-5 inches wide.

This is how I make my pincushions.  I cut a circle of fabric at least twice the diameter of the opening of the container.  Let's say your container has a 4 inches opening.  You have to cut an 8-inch circle.    Using a sewing needle with strong thread, I sew running stitches around the circle of  fabric, 1/8 inch from the edge.  Fold in the raw edge is optional.  Pull the thread to make a pouch.


Fill 2/3 full with crushed walnut shell and stuff the rest with polyester stuffing.  Put in enough stuffing to make a firm ball, not too tight that you have a hard time pushing a pin in. 

  Sew the opening close completely.


Hot glue the cushion to the inside of the container.  Be careful of the hot glue.
Below are samples of different containers.

If your container has a straight side like these, add 1/2 inch to the diameter of the fabric circle.


If you want a ruffle;  cut a piece of matching fabric 2 1/2 x 42 inch.  Fold the fabric in half, lengthwise.  With the same strong thread, make a running stitch 1/8 inch from the raw edge.   When you reach the end of the strip, pull the thread and evenly distribute the fabric along the line and secure the end by tying a knot.  Start by gluing the ruffle to the container, overlap the end.  Trim off the excess.   Position the pin cushion on top of the ruffle, then glue it on.

These are great gifts for your sewing buddies.  Have fun making them.  Hope this tutorial is helpful.  Come back and share some pictures of your own creations.  You can send me an email to Craftheaven09@gmail.com.

Have a great day!!


My hand quilting experience continue..... Part 2

After the first quilt, I still didn't have the confidence in hand quilting.  I felt I didn't do it right because I mixed hand quilting with some machine quilting.  I was impatient and didn't have the right skills.  The machine quilting looks terrible too so I stopped after a few squares done.  Until today that poor quilt is still not done.

Then a few months ago, a daughter of a very dear friend of mine gave me a sewing machine and a quilt top that her mother made because she knew I'm a quilter.  This quilt is a California-king-size double wedding rings quilt.  My friend made this quilt top before she had a stroke.  Now living in an assisted living home, she can't use her right arm or leg.  I told her daughter that I'd finish the quilt and give it back to her.  I feel that this quilt should be with her family.  I want to hand quilt it because I knew my friend loves hand quilting.  She traced all the quilting patterns on all of the squares and hand quilted on one square already. 

I approached another dear friend, Jo Ann, who I know has done hand quilting on all her quilts.  Jo Ann is a quilter, a sewer and a crafty person all around.  Her husband is also a crafted metal worker.  Jo Ann agreed to teach me and help me with this project and we set out to do just that.  One fine day on her back porch, we set the quilt on a frame that her husband made for her.  So in the past few weeks I got to sit down and quilt with her.  It was so nice and relaxing.  We got to share stories and we laughed a lot.  Times went by so fast and I really had a good time.  In the mean time I also learned to make bread and jam from Jo Ann.  She is a wealth of knowledge.  She is also kind and always doing some- thing for someone.  She'll make bread or treats for friends when she hears that they're in a distressed situation.  What a great gal she is!

With Jo Ann's easy going approach, I have gained confidence and enjoy the process more.  We didn't strive for perfection.  We didn't count the number of stitch per inch.  She just said, 'make the stitch as even as possible', and that's what I focus on.  On one of the square, I took 3 hours to finish.  Jo Ann works so fast and the quilting is almost done.  I'll post more pictures later when it's done.

Now I feel confident that I can do hand quilting.  I will take off the machine quilting that I did on my first quilt and finish hand-quilting it at last.  


Friday, October 10, 2014

My first quilt - a guinea pig for my hand quilting. Part 1


My quilting hobby started when I quit my computer career over 20 years ago to become a mother.  In 1991, our young family moved into our first home.  Soon I decided to make a tablecloth for our bare dining table.  I had seen quilts on magazine covers and fell in love with them.  I thought a nine patch quilt table top would be perfect for me.  I started sewing nine patch blocks but they looked terrible.  My blocks turned out uneven; no two blocks were the same size.  Having no clue of how to fix them, I put those blocks in a closet where they languished.   Two years later, we welcomed another child to our home.  My life was quickly filled with babies diapers, mommy and me classes, PTA and Booster Club meetings and church callings.  Fifteen years later I found those blocks and decided to take a quilting class in an adult education program at a local high school.  With help from a great teacher, a square ruler and a rotary cutter, I trimmed them all to the same size.  I also made some more half triangle blocks to finish the quilt top.


I decided to try hand quilting.  I saw my friend's quilt that she hand quilted and I thought, 'oh, it's so easy, she uses running stitches.'  So I did the same.  After quilting almost half of the half triangle blocks, I showed it to my teacher and she almost passed out.  'No, no, no she said, 'that's not the way to hand quilt!'  So she showed me the correct way to hold the needle and how to move it up and down.  The stitches came out more even and looked better.  I finished the other half of triangle blocks.  When it's time to do the nine patch blocks, I would try all sort of motifs on them.  Because there were a lot of seams on the nine patch blocks, I had a hard time hand quilting through them.  I started to lose interest and became very impatient with them, so I decided to machine quilt instead.  In another words, I was trying to learn machine quilt at the same time.  But then I found myself starting and stopping the machine many times within one block so I changed to a different motif design.  By this time my poor first quilt had so many weird looking quilting motifs on it.  I told myself, 'it's ok, no one will see this quilt.'

Needless to say the quilting on this quilt was terrible.  But I love this quilt still and use it every time the weather turns cold.  It's a lap quilt and it's perfect for watching TV with.  As you can tell, I changed my mind about using it as a table cloth.  I didn't want anyone to spill any thing on my hand quilted first quilt.  Are you kidding?  I spent many, many months on this quilt, so I bought an inexpensive table cloth instead. 


That was my first experience with hand quilting.  Next post, I'll tell you about my other experience with hand quilting.

Tuesday, August 12, 2014

Upholstery job for a dear and wonderful couple

I finally finished making cushions for a loveseat and a rocking chair for a very dear couple that we know from church.  It took me awhile because of the book proposal but they've been very understanding.  The fabric that my friend chose are perfect for the job.

Here are some before and after pictures.

Loveseat - before
Loveseat - after


Rocking chair - before
Rocking chair - after


Proud owners


Friday, August 1, 2014

Cherries Jubilee is finally up on the wall at the Quilt Emporium

The Cherries Jubilee quilt is finally up on the wall at the Quilt Emporium for display.  Check their website for the class schedule.


Tuesday, July 29, 2014

All pending projects are done. Now the work for the book begins

I have been busy with the upholstery job that I promised my friend and I got it done yesterday.  It's a cushion job for a love seat and a rocking chair.  My friend's husband refinished all the wood and now they will have all new cushions to sit on.  I'm waiting to hear from her when I can deliver the cushions.  I'll post before/after pictures after the delivery.  This will be the last upholstery job for this year.  All new job will have to wait till next year and I already have 2-3 jobs on the list.

Yesterday I also got a charity quilt top done.  Here it is


After I dropped off the first charity quilt top, they encouraged me to make more, so I picked up another jelly roll.  I found this pattern on cluckclucksew.com, it's called strip and flip.  Really easy and looks great.  I really like it.  People at the guild said that these quilt tops will finished and given  to children who are in foster homes.  It makes me feel good to be able to use my talents to do some thing for someone.

Now that all pending jobs are done, I can dive into the book project.  A few weeks ago, I got a book contract from the AQS publisher.  I'm still pinching myself to see if I'm dreaming.  Several years back, I came up with a new technique to make rag quilts.  I submitted pictures to several magazines and the Quilt Life responded, and now I'm working on a book.....  :)

Wednesday, July 9, 2014

A new quilt for class @ The Quilt Emporium

I did a lot of sewing in the past week, got 2 quilts done.  One is for donation at the Valley Quiltmakers Guild.  There are precut fabric bundles available for members who want to make a quilt for donation.  I'm pretty new to the Guild and wanting to do something so I took one bundle and this is what I made.  I happened to have some solid pink left over from old project so I added it in.


The other project is for a class at the Quilt Emporium.  I finally finished Jill Finley's Cherries Jubilee.  Jill's pattern is easy to follow.  I love the way the vines go all over the quilt and out to the border.  There are a lot of first times for me in this quilt.  It's my first time to work on applique pieces of the vines and leaves.  I've never made a bias tape before.  From this project, I've learned a lot about cutting bias tapes and bias binding.  It's also my first time to make a quilt with scalloped edges.  I quilted the whole thing with nylon thread both on top and bottom.  At first I was a little apprehensive about putting the nylon thread in the bobbin.  Many people said not to do it.  I adjusted the tensions and it worked out nicely.  I'm very happy with the way the quilt came out.


Saturday, June 21, 2014

Giftbag project and new quilts in the making


I've been very busy with making projects, gardening and landscaping front and back yard.  Needless to say it's a lot to do, so I have to divide my time to each task the best I can.

I would like to share the new projects first and in a few days, I'll share about other things that I'm working on.  Here is a very cute gift bag that I made for the quilt run at the Quilt Emporium which is going on right now.  It's from a pattern by Bonnie Olaveson. Bonnie's blog is filled with lovely projects and a lot of eye candies.  Go to 'http://cottonway.blogspot.com/' and you'll see what I mean.


 There are couple of quilts that I'm working on right now; one is from a pattern by Jill Finley's "Cherries Jubilee", the other is my own design.  I'm working on Cherries Jubilee first because I really love her designs.  More pictures to come but this is what I got so far.


Go to her website, "http://www.jillilystudio.com/" for the finished quilt picture and other nice things she has on there. 


Tuesday, April 29, 2014

Another pin cushion

I didn't work on any quilts after finishing the two pillows.  It's the garden's turn to get my attention this week.  I've been busy in the vegetable garden and the yard.  We got rid of the water thirsty lawn a few years ago and now I got tired of looking at the bare dirt.  I put some succulents and California native plants with some rocks I got from a friend's yard.  It's an on going project and there are changes every day.  Here is the picture of it so far:


Yellow iris are very beautiful this year.  Too bad I can enjoy them only for a few weeks and then they will be gone until next year.


Yesterday I took a break from gardening to make this pin cushion for a new class at the Quilt Emporium.


Wednesday, April 16, 2014

New Pillows for Quilt Emporium store


When I was trying to think of a new pillow design for a new class at the Quilt Emporium store, I saw a book called 'Home Sweet Quilt' by Jill Finley.  I adapted one of her design for this project.  Check out the book at the store, Jill has a lot of lovely design in this book.


I made another pillow using the same fabric but different technique.  This technique is called 'Faux Rag' and is published in the Quilt Life magazine.

Go to the store website at www.quiltemporium.com for the class schedule.

Tuesday, April 1, 2014

New projects for class at The Quilt Emporium

April 1, 2014


 Here are two pillows I'm working on for the new class in the second quarter of 2014.  I adapted the design from a book called  'Jill Finley's Home Sweet Quilt book'.  Check out the book, there are so many cute designs in this book. 


While I was working on the pillows, I took a break and made this pin cushion.  I love collecting milk glass and would buy them wherever I see them.  I got this piece from a thrift store while we were on the road.  Didn't know what the piece was for, but I liked the look of it.  So I cut a piece of circle of fabric twice the diameter of the opening of the milk glass piece.  Using a sewing needle with strong thread, I sew running stitches around the circle of  fabric, 1/4 inch from the edge.  Pull the thread to make a pouch.  Fill 2/3 full with crushed walnut shell and stuff the rest with polyester stuffing as much as I can push it in.  Sew the opening close completely.  with a piece of matching fabric, I make a ruffle and glue it on the cushion.  Glue the whole thing onto the milk glass and voila, I got a new pin cushion.   The milk glass is very sturdy, it won't tip over when I stick pins into the cushion.